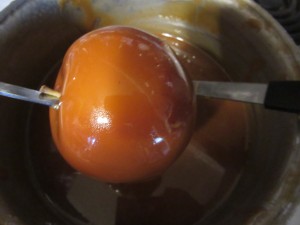
- Boiling
- Nice & thick
- Spoon over apples…
- Or place in a parchment paper lined tray and cool into chewy candies.
A fall tradition in our home involves making our own caramel apples. My kids all swear homemade tastes best and look forward to making them. Most caramel recipes call for corn syrup. This is something I have had in my house once, for a science project. In years past, I have always made a syrup to replace corn syrup but this year I happened to have extra honey on hand, and that is what we used. Compared to other sweeteners and whatever it is that corn syrup has that benefits the formation of caramel, honey also has. So it’s a safe substitution.
We used metal skewers as sticks because that is what we had on hand. I made a double batch of this, which coated 7 apples (the recipe I am providing will do 8 apples and maybe a few more). The remaining caramel was poured into a silicon bread mold and filled it about 1/4 of the way up. This made it easy to dump out to cut into yummy squares!
During the process of making caramel, you are essentially boiling the pot of sweetness until the water content reduces. There are different stages of caramel that will result in different results based on what temperature your mixture reaches. You can make a sauce that is great for coffee and topping ice cream and desserts, or caramel that will cool into chewy candy and coat apples, or caramel that will cool into a hard candy. You are going to bring your caramel mixture up to the “firm ball stage” which, if you are using a candy thermometer is the area between 244-248F. Candy thermometers can be misleading, because if you read the temperature while the tip is touching the bottom, it will read higher than the mixture actually is, which can produce difference results in your candy. I use a candy thermometer just to gauge where I’m at, then I always follow up with a cold water test.
The cold water test is very simple. Have an ice cold glass of water ready and drop in a spoonful of caramel from the bubbling pot. As you drop the spoonful in, it may completely dissolve (still need to boil quite a bit longer), or form threads that just smear when you try to touch them (still needs to boil, but you’re getting closer), or form a ball that will flatten when removed from the water (soft ball stage – good for soft candies), or form a ball that can be squeezed and rolled in your fingers (firm ball – this is the stage you want for caramel apples and chewy candies), etc. the temperature will continue climbing as water content is reduced and it will change the result of your caramel. For the purpose of this article, we will focus on the firm ball stage.
Ingredients:
- 8 apples
- 1c heavy cream
- 1c brown sugar
- 1/2c honey
- 4tb butter
Method:
- Set out a sheet of aluminum foil that has been sprayed with nonstick spray. Or parchment paper is fine, too.
- Wash your apples with warm water and a gentle cleaner. You want to remove the wax from the apples if they are storebought. Be sure they are completely dry.
- Dissolve your sugars and honey into the heavy cream over medium heat. You may need to raise the heat a bit if you have been stirring and heating over medium for a while without much result. Stir, stir, stir (gently).
- Add the butter. Stir constantly until the butter has dissolved.
- Boil and stir the mixture until you have reached the firm ball stage, where the caramel will hold a ball shape in your hands even when removed from the cold water. Remove the pot from the heat.
- As the pot cools, the caramel will thicken. You don’t want to wait too long to let the pot cool though, or it may get too thick to coat apples. A few minutes after it’s done boiling is a great time to start spooning caramel over skewered apples, I found. If you wait too long, you can gently reheat the caramel over low until it’s able to coat apples again. Avoid re-boiling the mixture, as any time you bring the mix above boiling you risk changing the final result because more water will be boiled off.
- Once apples are coated, place them on the foil or parchment paper until they are cool. They will detach from the paper quite easily if they are cooled enough.


