Starting your own plants from seed is the most economical method of growing food. If you buy a pack of yellow onions for say, $2-something per pound,you get maybe 8 or so onions. But you can buy a pack of seeds that has 300+ seeds for $2.75 or so and grow tons more. It makes sense to save money on your grocery bill by planting a garden starting with seeds in most cases.
Some seeds do require a head start indoors though. Most of the materials you will use, can be re-used year after year, which helps keep gardening affordable. The seeds that require starting ahead indoors (sometimes as many as 15 weeks ahead of your last frost) will require a container to plant them in, seed starting mix or potting soil (or peat cubes or pellets), a way to water tender seedlings (a spray bottle works just fine for small amounts of seedlings), and a way to provide sufficient light to growing seedlings. In our little area of Michigan, that late winter sun isn’t close enough to the earth to fuel our seedlings, which can leave them reaching for the sun and growing leggy and weak. Supplemental lighting, such as fluorescent light fixtures, are extremely helpful for success. A warm spot for the seed to sprout is also vital. Different seeds sprout and grow best at certain soil temperatures, so it is important to know what those are for optimal germination. If water, light, and temperature are not provided in sufficient amounts, you will experience spotty germination or weak and slow growth.
Extra things that are helpful include a way to circulate air around your growing seedlings (such as a small fan) and a way to hold in humidity in the early days right after planting until your seeds have sprouted (if you purchase a 72-count seed starting tray, those sometimes come with clear plastic domes to place over the top which are sufficient for holding in humidity. If you don’t have those, plastic wrap will do just fine).
First things first…
The process of starting seeds is fairly easy. You will first want to find out when the last frost date is for your area. Then, decide what needs to be started indoors and when. Some seeds, like celery, onions or artichokes benefit from a very early start – 10 to 15 weeks ahead of your last frost. Most seeds are best started in the 4-8 week range, ahead of your last expected frost. Mark these dates on a calendar so you can see at a glance, what to start when.
The seed starting process:


To start your seeds, fill your planting container with potting mix or seed starting mix. Do not use soil from outdoors or garden soil from your garden center. You want the bag to read “potting mix” or “seed starting mix.” The reasons for this are simple – soil from outdoors may contain pests or disease that will kill your seedlings, and it is often too heavy for tender seedlings to emerge from. It is famous for developing a ‘crust’ on top if moisture isn’t kept perfect, which can prevent some seeds from sprouting at all. It may hold too much moisture, causing your seeds to rot. Potting mix and seed starting mix are key because they are light, retain moisture, and in some cases, will even feed your seedlings if fertilizer is included. Seedlings don’t need fertilizer right from the start as they have food stored up in the seed, however, if they will be kept indoors longer than a few weeks, fertilizer is beneficial and in many potting soils, is already included in the bag.


Once your container has been filled, lightly firm the soil, creating a place for the seeds to be placed. If you are like me and starting many seeds at once in a plug tray, I find it helpful to take another seed starting container of the same size (such as a 6-cell insert or a whole plug tray) and gently set that on top of the filled tray to help the seed starting medium settle into its container and create a place to place my seeds. You may also plant seeds in rows or broadcast them over the surface of a wider container, or a seed tray without the 6-pack inserts. If planting seeds in rows in a wide, flat container, make furrows for the seeds about an inch or two apart to make the best use of your space. If planting more than one variety of seed in the same container, be sure to mark which rows belong to which variety.
Place your seeds into the container, then cover with more soil if necessary. Your seed packet will tell you how much, but if you don’t have specific information for your seed the general rule is to plant the seed 1-2 times its diameter. Teeny tiny seeds may not need to be covered at all, but rather gently pressed into the planting medium. I water all of my seeds once the seed has been set in the planting medium, and the watering helps press the seed into the soil instead of doing it by hand.
Watering:
Once your seeds have been planted, this is a great time to water them. Be sure that whatever container you use has holes for proper drainage. I like to give my seeds a thorough watering at this point and then sometimes I cover them with plastic wrap (not wrap tightly, just cover to retain humidity). From this point on, any watering will be done with a spray bottle. Generally, I don’t need to water the trays again that have plastic wrap on them until the seeds sprout, but this can vary considering some seeds can take up to three weeks to germinate. I avoid heavy watering from there on out though, to prevent the seeds from rotting.
Light:
Some seeds require light to germinate, such as celery. For these seeds, they get put right under lights for 12-16 hours per day as soon as they are planted. Other seeds don’t require light until they sprout, so they are set in the greenhouse on an unlit shelf until I notice the first germination occurring, then they are placed under lights. All seedlings do require light, and in many cases late winter sunlight coming through the window is not sufficient. The closer to spring you get, the better the sun will be, but for the early season stuff you will need supplemental lighting. I have found great success using fluorescent light fixtures, also called shop lights, and I have two of these per shelf on many shelves in my greenhouse. You can choose to use grow lights, but they are unnecessary for sprouting seeds. If you want to grow plants to the point of flowering or fruiting, you will need grow lights.
Heat:
Check the optimal soil temperature for seed germination and growing (these may be different) and plan accordingly. Place your seed tray in a suitable location – such as on top of your refrigerator, near a wood stove or other heat source, or on top of a heat mat made for seed trays (keep the mat on 24 hours a day, and turn it off once your seeds sprout). Then, it’s time to wait.
While You’re Waiting…
Check your seed trays twice per day to turn on/off lights, check moisture and consider temperature to be sure it’s not too hot or cold. Make note of what seeds you started and when, then figure when you can expect to see sprouts poking through the soil. Once you notice seedlings poking through the dirt, it is usually safe to remove the plastic cover you may have been keeping on them for humidity and remove the heat mat, if you were using one. At this point, keeping the soil moist enough but not too wet is critical, especially once any protective coverings have been removed. If you have not yet placed your seeds under lights, once they sprout it is critical that they are able to be put under artificial or natural light. If using artificial light, set the light within a couple of inches of the tops of the seedlings, and raise the light as they grow. Seedlings should get about 16 hours of light per day.
From here, maintain daily care. You may need to fertilize the seedlings after a few weeks, and depending on how fast they grow you may need to “pot up” or transplant the seedlings to a larger container before they are ready to head to the garden outside. We will talk about these things in later blog posts.
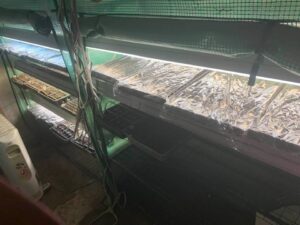
Pictures:
Here are some pictures of seeds in the process of sprouting. I set up a 4×8 greenhouse in the basement and placed four of the 4-shelved mini greenhouses in there (4ft wide) for shelving. Some of the shelves have 2-4ft shop light fixtures per shelf and I can fit 4 seed trays per shelf. In here I keep a oscillating fan and a radiant heater, to provide air circulation and temperature control.